So Hurricane Irene is supposed to hit us late tomorrow night. Or at least the edges as the last update I saw indicated. I am bound to lose power, so any sewing might be by hand.
I've been working on my "Changes for Felicity" dress. I miscalculated with the back of the bodice so it doesn't close exactly how I want. I haven't figured out how I am going to fix it, but fix it I will! Otherwise, I think it looks great.
We got our new Project Project Runway challenge:
Create a look to go with Heidi’s New Balance Sneakers. Think fashion, don’t think just gym. It could be a dress or a suit. Think classic with a twist. You have to use a fabric used in Heidi’s shoe which are denim and suede. The denim or suede does not have to be the dominate fabric, but it does have to be evident.
So, major product placement for Heidi's crappy fashion line. Heidi is a hack designer and her ugly shirts and pants are overpriced and don't look like they would look good on anyone. The models clomping down the runway, looking duckfooted, in her shoes was pretty funny.
But anyway, due to being somewhat housebound for the weekend (got to spend tomorrow battening down the hatches), my fabrics are going to be limited to what I have on hand. I have some maroonish suede that I might use but mostly I am going to stick with denim.
26 August 2011
25 August 2011
Project Project Runway - Challenge 4 - Dress Nina Garcia
Whew, another Project Project Runway outfit done. I don't know how it happens, but I am always rushing at the last moment even though I try to get it all done early. Today I blame listing more stuff on ebay which kept me from doing my final finishing touches til very late.
Anyway the challenge was:
Create a look Nina can wear to work in the day and then to an industry event in the evening. She tends to wear classic with an edge, clean, stream-lined, tailored silhouettes. She does not like voluminous clothes, pleats, loud colors or loud patterns. She does not want to see a bunch of grey garments going down the runway though.
So, basically, Nina is a picky bitch who likes what she likes and she doesn't like you. I presented my sketches to "Nina" (aka, 2 coworkers) and they chose idea 1.
 The material I decided to use was muted but still had a pattern. And there was a purse I took apart to get some "leather".
 Turns out my sewing machine doesn't handle leather or pleather or whatever very well. Which made it tough to sew. I got around that problem for the skirt, but for the top, I broke out the glue gun and attacked the leather with hot glue. Some details in the original sketch were left out and might get added in at a later date. I just had too much else to do to get to it.
Anyway the challenge was:
Create a look Nina can wear to work in the day and then to an industry event in the evening. She tends to wear classic with an edge, clean, stream-lined, tailored silhouettes. She does not like voluminous clothes, pleats, loud colors or loud patterns. She does not want to see a bunch of grey garments going down the runway though.
So, basically, Nina is a picky bitch who likes what she likes and she doesn't like you. I presented my sketches to "Nina" (aka, 2 coworkers) and they chose idea 1.


17 August 2011
Project Project Runway - Challenge 3 - DONE
So I didn't really sketch the outfit out. I kinda knew what pieces of fabric I wanted to use and the outfit basically created itself.
Here is the challenge:
Create a look for a model on stilts. It looks as if the stilts extend the models about as far at from the knee to the foot. So if you are engineering stilts for your model think about making them about 1/4 taller.
Create a look that is eye-catching, imaginative and truly larger-than-life, but remember, the judges frowned upon “costume” looks, and responded favorably to the looks that would translate to the runway.
If you want to imitate this challenge even more, have your runway outside.
Time Limit – You have 14 hours to complete this challenge.
I guess the point of the challenge was that when fashion designers sketch, they invariably create pictures that have impossibly long legs so here was a chance for the designers to actually see those sketches come to life. Whatever, when I sketch, my sketches have normal proportions.
My stilts and material:
 For the stilts, I took a used shipping box and cut it down into 8 strips. I taped the strips together to make a box and then used some extra to make the top and bottoms. I poked holes through the tops and threaded some ribbon through and tied it onto the doll's feet. She can stand on her own for short periods of time, but I also have a doll stand that can telescope to help support her. As for the material, I had been reading too many fashion magazines that were all about mixing patterns and so decided to try it.
Here is the finished look:
 The top is a black and white check cotton and the bottom is a floral/paisley/something print polyester in black, white, and gray. There is a silver button that is acting as the bling. The doll's feet are right about at the level of the bling and everything lower than that is stilt. The material is a bit sheer and if you squint, you can actually see the brown boxes.
 The first image is a closeup of the center of the dress so you can see how the patterns mix. I don't know if I did a good job, but it doesn't look horrid to me... The second view is a side shot that shows some of the poofiness of the dress. The final picture is what the doll would look like wearing the dress without her stilts. Pretty silly, right?
My only regret is that I didn't go a bit crazier with the stilts. I think that in the front picture, she looks awesome and almost regular height. I wish I had exaggerated it a bit more with taller stilts.
Here is the challenge:
Create a look for a model on stilts. It looks as if the stilts extend the models about as far at from the knee to the foot. So if you are engineering stilts for your model think about making them about 1/4 taller.
Create a look that is eye-catching, imaginative and truly larger-than-life, but remember, the judges frowned upon “costume” looks, and responded favorably to the looks that would translate to the runway.
If you want to imitate this challenge even more, have your runway outside.
Time Limit – You have 14 hours to complete this challenge.
I guess the point of the challenge was that when fashion designers sketch, they invariably create pictures that have impossibly long legs so here was a chance for the designers to actually see those sketches come to life. Whatever, when I sketch, my sketches have normal proportions.
My stilts and material:

Here is the finished look:


My only regret is that I didn't go a bit crazier with the stilts. I think that in the front picture, she looks awesome and almost regular height. I wish I had exaggerated it a bit more with taller stilts.
11 August 2011
Project Project Runway - Challenge 2 - The Reveal
So it is Runway Day! I need to get off to work, so I'll redo the post with the story of the design later on. For now, just pictures!
Front and Back:


Closeups:

Accessories:

Front and Back:


Closeups:

Accessories:

10 August 2011
Project Project Runway - Challenge 2 - Done!
Whew, I thought I wasn't going to make it on this one. I was just uninspired until about yesterday. The challenge rules were:
Use anything from a pet store to make your design. (If you have pet stuff at home you can use it rather than buy something.) You can use a base fabric like muslin to build your outfit on. Tim reminds us, “The judges do not respond well to looks that come out of unconventional challenges that use a lot of fabric.”
So this was the unconventional materials challenge. In the past they've taken the designers to hardware stores, party stores, etc. This time it was a pet store. Since I live in the middle of nowhere, I chose the Walmart and Dollar General pet aisles as my "pet stores."
Here are my materials:
 They are Kitty Litter Box Liners in white (and smelly!), Puppy poo-poo bags in blue with little silver paws on them, and a dog tug of war rope toy in teal, pink, and mauve.
My sketch:
 I was going for a 40's inspired silhouette, with vertical stripes using the litter liners and poo-poo bags and fringe at the bottom and neckline using the tug-of-war toy. I was also going to make a jacket out of the tug of war toy.
That isn't what happened. I was looking at what the designers on the show created more closely and one of them did something very similar to what I was going to do. So I had to re-plan. I tossed out the dog toy and concentrated on the plastic bags.
The reveal comes tomorrow, but let me say how happy I am it is done because whew, my fingers are tired of shoving that needle through the plastic. And any red spots on the dress are from stabbing myself with the needle. It was ouchies.
Use anything from a pet store to make your design. (If you have pet stuff at home you can use it rather than buy something.) You can use a base fabric like muslin to build your outfit on. Tim reminds us, “The judges do not respond well to looks that come out of unconventional challenges that use a lot of fabric.”
So this was the unconventional materials challenge. In the past they've taken the designers to hardware stores, party stores, etc. This time it was a pet store. Since I live in the middle of nowhere, I chose the Walmart and Dollar General pet aisles as my "pet stores."
Here are my materials:

My sketch:

That isn't what happened. I was looking at what the designers on the show created more closely and one of them did something very similar to what I was going to do. So I had to re-plan. I tossed out the dog toy and concentrated on the plastic bags.
The reveal comes tomorrow, but let me say how happy I am it is done because whew, my fingers are tired of shoving that needle through the plastic. And any red spots on the dress are from stabbing myself with the needle. It was ouchies.
04 August 2011
Project Project Runway - Challenge 1 - The Reveal
So, here is my Project Project Runway Challenge 1 final product:

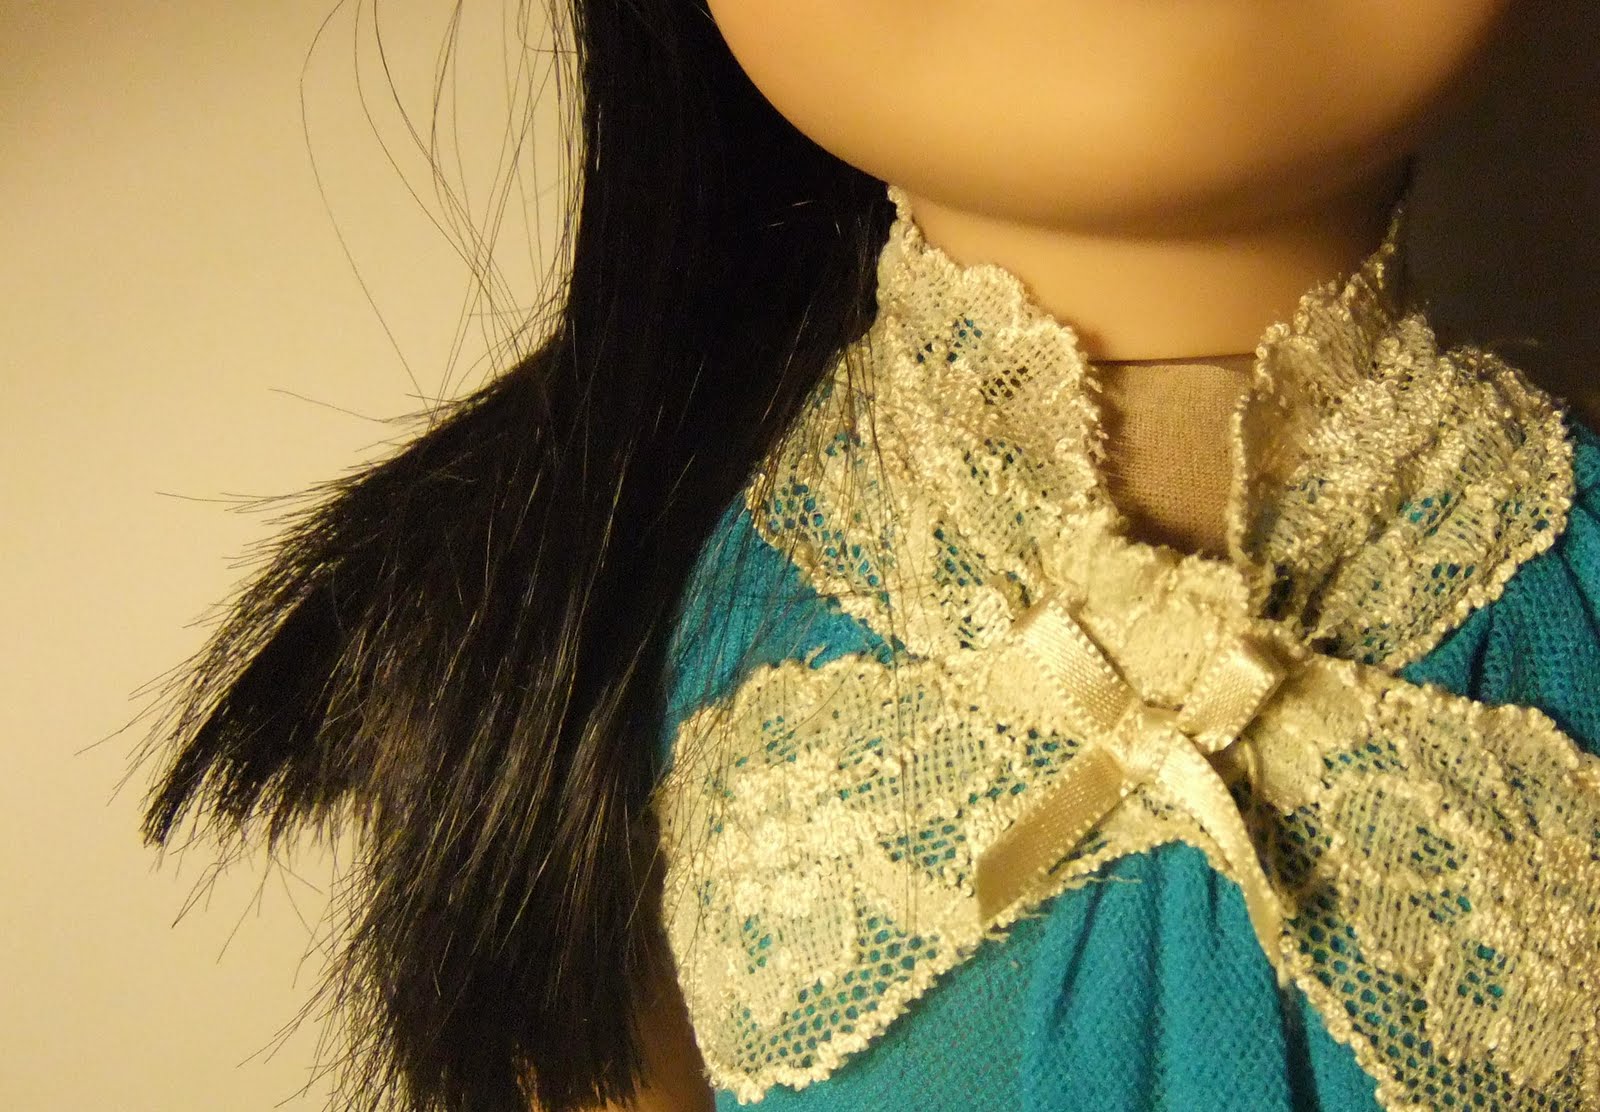
 Here is the front and back on my model, Angharad. The skirt is dyed purple with a hint of blue. I cut petal shapes and outlined them with a swoopy stitch in turquoise on the under layer and biege on the upper layer. I then layered them and sewed them together with the turquoise swoopy stitch to help give the skirt some shape. The top is gathered turquoise netting material and I reused the lace detailing from the pajama top to make the straps. A small cutting of the same lace and the bra straps made the belt. Here are some closeups:


I like how the lace made a mandarin-like collar and how the purple dye turned the white sheet into something that looks suede-like. I also like how the gathering in the front made a pleat down the center. I think it adds a bit more interest than simple gathers would have.
I would accessorize it with this bracelet from the "piperlime accessory wall"
 With also a small pair of earrings in a gold color. The simple sandals Angharad is wearing I would keep also.
So there you are, my completed outfit. I'll get a new challenge on Friday and judging by the previews, it will have to be something made from what you can find at a pet store. Anyone got any cat food bags to donate? ;) I've also started laying out the pattern for a Williamsburg outfit for my Felicity doll. Updates on that to come.


I like how the lace made a mandarin-like collar and how the purple dye turned the white sheet into something that looks suede-like. I also like how the gathering in the front made a pleat down the center. I think it adds a bit more interest than simple gathers would have.
I would accessorize it with this bracelet from the "piperlime accessory wall"
So there you are, my completed outfit. I'll get a new challenge on Friday and judging by the previews, it will have to be something made from what you can find at a pet store. Anyone got any cat food bags to donate? ;) I've also started laying out the pattern for a Williamsburg outfit for my Felicity doll. Updates on that to come.
02 August 2011
Project Project Runway - Challenge 1 - Done!
So I finished my outfit for Project Project Runway. I need to pick some accessories and style my model's hair, but otherwise, I think we can put a stamp on it, it's done!
Speaking of PPR, I thought I'd share my hints on where to get good material for doll clothes. The best place I've found is the thrift store or goodwill. They are grateful for the business, you are keeping some ugly clothes off the street, and you can find some great patterns. The military base where I work has a thrift store that is open once a week for a few hours. I went last week and discovered "sack day." $5 for whatever you could fit into one paper grocery bag. You bet I tried to clean them out. For striped doll clothes, finding a pattern in the right scale at the fabric store is often a challenge. Finding a pattern in the right scale in a men's shirt - easy. An extra step of dying it and you have a great piece of material that could make several outfit. Don't shy away from some really ugly fabrics--you never know what kind of cute outfit they can make. The material that made the striped Josefina skirt from my earlier post was hideous for everything but what I used it for.
Here is a picture of everything I purchased at the thrift store for $5:
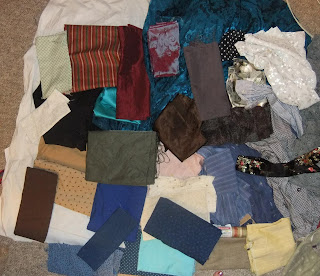
It's hard to tell, but there are about 36 different pieces of fabric there. Some big, some small, a horrible 80s prom dress, some men's shirts... Keeping remnants and other fabrics around is great for when that creativity bug hits.
30 July 2011
Project Project Runway - Challenge 1 - Getting it together
From the Just Crafty Enough blog:
The rules: You can use either the clothes your model is currently wearing OR a 10″ x 10″ square of fabric similar to your own pajamas. On top of that, you can use a handkerchief worth of white cotton or cotton-ploy blend fabric. The standard woman’s handkerchief is 10″ x 10″. You can manipulate the fabric anyway you want with dye, fabric paint, etc… You can also add things like buttons, velcro, and trims.
My changes: The organizers of the challenges use Barbie-sized models. My model is at least 3x bigger around than that, so I’ll be increasing what is allowed material wise. I am not going to go overboard, but a 10 x 10 square won’t even go halfway around my model. She is plus-sized. ;) Also, I will use my old camisole that I sometimes sleep in as my pj material. Here is what it looks like:

I won’t be using all of that white sheet, I just haven’t had a chance to cut it down yet. J
Meet my model:


She is an American Girl Just Like You #25. I’ve named her Angharad since she looks Welsh to me. She has brown hair and brown eyes. Since she is technically supposed to be a 9 or 10 year old, I had to make her some falsies to give her more of a figure. I might add some butt and hip pads later. To hold the falsies in, I took a pair of nylons and made her a three-layer body suit. I could probably use the control top part of the hose and reduce the number of layers, and I might do that later on, but this will work for now. Her measurements are 14--11--12. So you can see a 10” x 10” handkerchief won’t even go around her waist.
The sketches:

I couldn't find my color markers and I am not sure what colors I'll end up with anyway. I'm also not sure which outfit I'll make...well, I have an idea, but I'll save the reveal for the runway. I plan on dying the sheet material—as soon as I get some dishes done and the sink is clear—and then trying to sew with the very thin netting of the camisole. I’ve never worked with material like that before and I know that it is stretchy, so we’ll see if I can pull an Anya and make it work.
29 July 2011
Introducing: The Dolls
American Girl dolls are a fun collectors item. I've been focusing on getting the historical dolls, but I have a few Girl of the Year dolls. Since I've been collecting, these are the dolls I've gotten.

The dolls are: Rebecca, Kaya, Kit, Kirsten, Mia, Molly, Emily, Josefina, Nellie, Samantha, Ruthie, Felicity, Jess, Addy, and Julie. I do have a JLY 25 who isn't in the picture because I haven't gotten around to making her a Josefina-inspired outfit.
I've dressed them in Josefina's clothes, but she doesn't have enough in her collection to clothe everyone. Which got me sewing. If you are looking to start making American Girl Doll clothes for yourself or to sell, I'd recommend starting with Josefina. Her clothes are reasonably simple, easy to alter to create unique designs, and the instructions are very clear. You can buy the patterns on ebay or you can head over to AgPlaythings.com and download the .pdfs. You can print the patterns out on regular printer paper, but that does make them harder to use as they don't flex as well as a tissue paper. If you don't mind the lines, I'd recommend using lined school paper. It is a lighter weight of paper and will be a bit easier to work with.
The great thing about printing out the patterns instead of purchasing them is that if you want to make alterations to the designs, you don't have to worry about ruining the $30 pattern you purchased. Plus, you can print them as many times as you want when you've put a ton of holes in them with the pins. (That said, if they ever re-release the patterns, please stop using the scanned ones and purchase the official ones. It's a bit more legal. ;) )
Here are the dresses that are inspired by Josefina that I have made:
 I'll do blog posts on each of them describing what patterns I used to make them, things I learned, etc.
Finally, I am a fan of Project Runway and there is a group of crafters doing a thing called "Project Project Runway." I plan on trying to "play along" with them though I don't know if I'll exactly follow the rules for each challenge as my AG dolls are a bit bigger than the Barbie-sized dolls the organizers are using.

The dolls are: Rebecca, Kaya, Kit, Kirsten, Mia, Molly, Emily, Josefina, Nellie, Samantha, Ruthie, Felicity, Jess, Addy, and Julie. I do have a JLY 25 who isn't in the picture because I haven't gotten around to making her a Josefina-inspired outfit.
I've dressed them in Josefina's clothes, but she doesn't have enough in her collection to clothe everyone. Which got me sewing. If you are looking to start making American Girl Doll clothes for yourself or to sell, I'd recommend starting with Josefina. Her clothes are reasonably simple, easy to alter to create unique designs, and the instructions are very clear. You can buy the patterns on ebay or you can head over to AgPlaythings.com and download the .pdfs. You can print the patterns out on regular printer paper, but that does make them harder to use as they don't flex as well as a tissue paper. If you don't mind the lines, I'd recommend using lined school paper. It is a lighter weight of paper and will be a bit easier to work with.
The great thing about printing out the patterns instead of purchasing them is that if you want to make alterations to the designs, you don't have to worry about ruining the $30 pattern you purchased. Plus, you can print them as many times as you want when you've put a ton of holes in them with the pins. (That said, if they ever re-release the patterns, please stop using the scanned ones and purchase the official ones. It's a bit more legal. ;) )
Here are the dresses that are inspired by Josefina that I have made:

Finally, I am a fan of Project Runway and there is a group of crafters doing a thing called "Project Project Runway." I plan on trying to "play along" with them though I don't know if I'll exactly follow the rules for each challenge as my AG dolls are a bit bigger than the Barbie-sized dolls the organizers are using.
28 July 2011
Introduction: Welcome to my blog
Hi.
So I was pressured by a friend into starting a blog. Well, I used to use livejournal but this is slightly different. Please give me a bit of time to figure out the tone of the blog. Mostly, I intend to focus on making American Girl doll clothes and how to organize your American Girl collection. I might even try making a few YouTube videos about it.
A bit of background about me. I am not a professional sewer. The blog will probably focus on my errors more than the successes. Pro sewers will probably find fault with my methods, but those who are just starting out might find what I do useful. I'll try to focus on where I get my material, how I do the patterns, some of the sewing tricks I've picked up, and what not to do--things like that. So, I am not a seamstress, what am I? I am a mechanical engineer. I work for the military putting boxes in other boxes. Nothing especially relevant to the blog. I've had an American Girl doll for about 20 years--a Molly. I stopped collecting the dolls when I went off to college (and maybe before that in high school, I can't recall) but started up again this winter. My collection has gone from the one doll to 16 or so today. To keep myself away from the ebay as much, I started sewing dresses for my dolls. I am creative, but often have trouble finishing projects. Doll clothes are great because it honestly doesn't take that much time to make an outfit. I've done a Josefina dress in a day. Of course, I also did one that took nearly a week. It depends on what you decide to use to embellish the outfit.
Stay tuned for more posts.
Subscribe to:
Posts (Atom)